What Happens Behind the Scenes of a Remodeling Project
When homeowners picture a remodeling project, they usually imagine the exciting parts — demolition day, new cabinets arriving, fresh paint going on the walls, and the final reveal.
But what most people don’t see is everything happening behind the scenes to make that transformation possible.
At Mr. Clean Fix, a huge portion of our work happens before a single tool even comes out of the trailer. A successful remodel isn't just construction — it's planning, coordination, and problem-solving every step of the way.
Let’s pull back the curtain and show you what really goes on behind the scenes of a remodeling project.
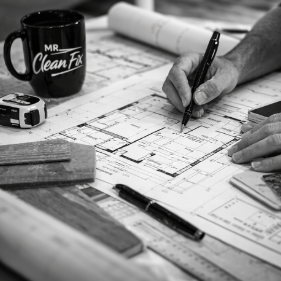
1. The Planning Phase
Before we start building, we spend time making sure everyone is on the same page.
This includes:
• Meeting with the homeowner
• Understanding goals and budget
• Measuring and documenting the space
• Discussing materials and layout
• Identifying potential structural or layout challenges
This phase helps prevent surprises later. A good contractor doesn’t just start swinging a hammer — we make sure there’s a clear plan first.
2. Material Selection and Ordering
Many materials have lead times that homeowners don’t always expect.
Cabinets, flooring, tile, fixtures, and specialty items often need to be ordered weeks in advance. Part of our job is helping schedule the project around when those materials will arrive.
Behind the scenes we are:
• Checking product availability
• Coordinating deliveries
• Confirming measurements
• Making sure everything will fit and install properly
Getting this right keeps the project moving forward without unnecessary delays.
3. Scheduling and Coordination
A remodeling project is a bit like a puzzle. Different pieces need to happen in the right order.
For example:
Demo
Framing or structural changes
Plumbing and electrical
Insulation and drywall
Flooring and cabinets
Trim, paint, and finishes
If one step is delayed, it can affect everything that follows. Behind the scenes we’re constantly adjusting schedules and coordinating the next phase of work so the project stays on track.
4. Problem Solving (Because Every Remodel Has Surprises)
One thing we’ve learned from years in the field is that every house has a story.
Sometimes we open a wall and find:
• Old plumbing that needs replacement
• Wiring that isn’t up to code
• Hidden water damage
• Structural framing that needs correction
These aren’t things homeowners see during the planning stage, but they’re common in remodeling work. A big part of our job is solving these problems quickly while keeping you informed about the best path forward.
5. Communication with the Homeowner
Good communication is what keeps remodeling projects stress-free.
Behind the scenes we’re often:
• Updating homeowners on progress
• Discussing decisions that come up during construction
• Adjusting timelines if needed
• Making sure expectations stay clear on both sides
A remodel works best when the contractor and homeowner operate as a team.
6. The Final Details
The last stage of a project often takes the most patience.
This is when we focus on:
• Final trim work
• Touch-up paint
• Fixture installation
• Adjustments and fine-tuning
These details are what turn a construction site into a finished space you can enjoy every day.
The Truth About Remodeling
From the outside, a remodel can look like a fast transformation. But behind every successful project is a lot of planning, coordination, and experience.
When done right, the behind-the-scenes work is what keeps the project running smoothly and delivers a finished result that lasts for years.
At Mr. Clean Fix, we believe the best remodeling projects are built on clear communication, careful planning, and quality workmanship from start to finish.

🎄 Deck the Halls Safely: Holiday Lighting & Outdoor Electrical Tips
It’s officially December — 25 days until Christmas and 31 days until 2026.
The holiday countdown has begun, and so has the decorating frenzy.
Whether you’re going full-Clark-Griswold or keeping it simple with warm white string lights, outdoor electrical safety matters. A few smart choices now can save you from tripped breakers, damaged wiring, or fire hazards (and keep the magic glowing all month long).
Here’s how to deck the halls safely this season.
✨ 1. Choose the Right Lights for Outdoors
Indoor lights aren’t designed to handle moisture, wind, or freezing temperatures.
Look for:
UL-rated outdoor or indoor/outdoor lights
Waterproof extension cords
Weatherproof connectors
If you’re unsure, check the tag near the plug — it’ll tell you.
🔌 2. Use GFCI Outlets Only
Any outdoor lighting plug should go into a GFCI outlet (the kind with a reset/test button).
These outlets cut power instantly if moisture or a short occurs — a must in winter weather.
If your exterior outlets aren’t GFCI, it’s time to upgrade.
🎅 3. Don’t Overload Your Circuits
Holiday cheer is great.
Holiday breaker trips? Not so much.
Keep these rules in mind:
Use LED lights — lower power + brighter + safer
Avoid running multiple large decorations on the same outlet
If lights flicker or cords feel warm, unplug and redistribute
Remember: even LEDs add up when you’re decorating the whole house.
🌧️ 4. Weatherproof Every Connection
Rain, sleet, snow — December brings it all.
Protect your electrical setup by:
Elevating plugs off the ground
Using cord domes or weatherproof covers
Keeping connections sheltered under eaves when possible
Moisture is the #1 cause of holiday electrical failures.
🪜 5. Ladder Safety: Don’t Become a Holiday Statistic
If you’re climbing on ladders to hang lights:
Have someone hold the base
Never lean too far to the sides
Only use ladders rated for outdoor use
Keep ladders away from icy ground
Every year, ERs fill with “just putting up the lights real quick” injuries.
Be smarter than that.
🌲 6. Secure Your Lights Against Wind
December winds love to yank lights off gutters.
Use:
Plastic light clips (never metal staples)
Zip ties
Gutter-specific clips for a clean, safe look
A securely installed display survives storms—and looks better.
🔥 7. Inspect Older Decorations
If you reuse lights every year, check for:
Brittle cords
Cracked insulation
Loose bulbs
Damaged plugs
If something looks questionable, upgrade.
Holiday lights are cheap; electrical fires are not.
💡 8. Add Smart Timers for Safety & Convenience
Timers save energy and prevent overheating from lights staying on all night.
Bonus: they make your home look lived-in, even when you’re away visiting family.